
Drag a handful of personal photos into most “free” GIF makers, and here’s what happens before you even click Convert photos to gif: your files leave your device, land on someone else’s server, and sit there under a terms-of-service page almost nobody reads. That’s not a conspiracy theory — it’s simply how upload-based converters work. If you’ve ever paused before uploading a photo of your kid, an ID, or an unreleased product shot to a random converter site, that instinct was right.
The good news is that converting photos to GIF doesn’t have to work that way. Below is a complete walkthrough for turning photos into a GIF for free, entirely inside your browser tab, plus the platform-sizing details most GIF guides skip.
Why most “free” GIF makers aren’t as private as they look
Type “photo to gif converter” into Google and nearly every result works the same way: upload your images to their server, let their server do the processing, then download the result. That’s how most of the well-known tools handle it, and to be clear, it’s not inherently dangerous — but it does mean a copy of your file exists somewhere outside your control, at least temporarily, governed by whatever that company’s terms of service allow for storage, analysis, or reuse. For a meme, that’s irrelevant. For a photo with a face, a location, a document, or anything client-confidential, it’s worth a second thought — which is exactly why more people are starting to think twice before uploading personal images to tools they’ve never used before.
There’s also a simple technical reason the upload step usually isn’t necessary at all. Modern browsers can read, resize, and stitch image frames together locally, using nothing but standard web technology. That’s exactly how our Image to GIF converter works — your photos are processed on your device and never touch a server. If you want the longer version of why that distinction matters, we’ve broken it down in our guide on whether online file tools are actually GDPR-safe.
Step-by-step: convert photos to GIF without uploading
1. Prep your photos. Pick images that are roughly the same dimensions and orientation — the more consistent they are, the smoother the animation looks. Mismatched photos? Straighten them out first with the Image Resizer or crop and rotate with the Basic Image Editor.
2. Open the Image to GIF tool. It loads instantly on desktop, tablet, or phone, with no account needed.
3. Drop in your images. Drag and drop, or browse to select several files at once. JPG, PNG, WEBP, BMP, and HEIC (straight off an iPhone) are all supported, so there’s no separate format-conversion step first.

4. Set your delay and dimensions. Delay controls how long each frame holds before the next plays, in milliseconds. For width and height, match your source images as closely as you can — mismatched dimensions get letterboxed, which looks unintentional.
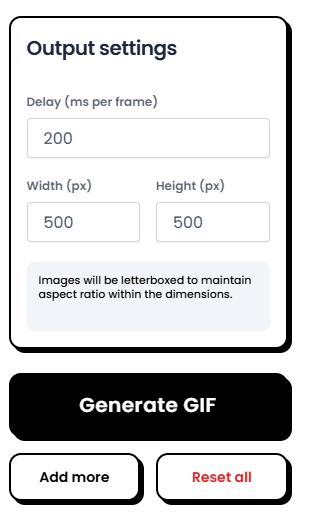
5. Generate and download. Because everything runs locally, there’s no upload bar to wait through. You’ll see a preview almost immediately, ready to download.
Browser-based vs. upload-based converters, honestly compared
| Browser-based (local) | Typical upload-based tool | |
|---|---|---|
| Where processing happens | On your device | On their server |
| Does your file leave your device? | No | Yes, at least temporarily |
| Wait time | No upload queue | Upload + processing queue |
| Good for sensitive photos | Yes | Depends on their policy |
| Cost | Free, no account | Often free tier + paid limits |
Neither approach is “wrong” — some upload-based tools offer heavier editing features like text overlays and transitions. But when privacy or speed matters more than extra effects, keeping the whole process local is the simpler call.
Pro tips for a GIF that doesn’t look amateur
- Delay timing: 200–400ms per frame reads as a natural slideshow; drop to 80–150ms for a punchier flip effect. Go under 50ms and it usually just looks glitchy.
- The 256-color ceiling: GIF is capped at 256 colors per frame by design. Photos with heavy gradients — sunsets, open sky — are the most likely to show banding. High-contrast, well-lit photos hold up best.
- Match your dimensions. Set the output width and height to your source size to avoid letterboxing or stretching.
- Fewer, sharper frames beat more, mediocre ones. Six to twelve well-chosen photos usually beat twenty similar ones, both visually and in file size.
GIF file size limits by platform (2026)
This is the part most tutorials skip — and it’s usually why a “perfect” GIF refuses to upload, or looks mangled after you post it.
- Discord: keep it under 1 MB for reliable posting (256 KB for custom emoji, 512 KB for stickers). The free-tier hard cap sits around 8–10 MB.
- WhatsApp: aim under 500 KB–1 MB. The technical cap is 16 MB, but WhatsApp compresses heavily above a much lower threshold — oversized GIFs often arrive as a static image instead of animating.
- X / Twitter: the cap is 15 MB, but it’s converted to video internally either way, so stay under 5 MB for clean playback.
- Facebook / Messenger: the most forgiving of the major platforms, accepting GIFs up to roughly 20–25 MB.
- Instagram: doesn’t accept native GIF uploads in feed posts or Stories at all. Convert to MP4 first, or use a GIPHY sticker inside Stories instead.
- Reddit: a practical cap around 20 MB, though most clients convert it to video or WebM on upload anyway.
If your export is still too heavy after adjusting delay and dimensions, run it through the Image Compressor to shrink it further — again, without uploading anything.
Common problems, and why they actually happen
- GIF looks blocky or banded → the 256-color limit, usually triggered by gradients. Try higher-contrast source photos.
- Colors look duller than the original → same cause. It’s a format limitation, not something you did wrong.
- File size ballooned → cut frames and shrink dimensions before touching the delay. Those two affect file size more than delay does.
- “My GIF won’t post to Instagram” → it’s not you. Instagram simply doesn’t support GIF uploads the way other platforms do.
FAQ
Is it safe to convert photos to GIF online?
It comes down to whether the tool uploads your files. A browser-based converter never sends your photos anywhere, so there’s nothing to worry about. With upload-based tools, safety depends on reading their privacy policy.
Does converting to GIF reduce photo quality?
Some change is unavoidable — GIF’s 256-color limit is a format constraint, not a tool limitation. Starting with sharp, well-lit source photos keeps the difference minimal.
Can I turn an iPhone Live Photo into a GIF?
Sort of, depending on what you mean. A Live Photo is technically a short video clip bundled with a still image, so an image-to-GIF tool only sees the still frame. To capture the actual motion in a GIF, you’d need a video-to-GIF tool instead. Regular photo bursts — multiple separate stills — work perfectly with an image-to-GIF converter like this one.
What's the safest GIF size for social media in general?
If you need one file that works almost everywhere: 480px wide, under 3 MB, with a shorter frame count. It won’t be optimized for any single platform, but it’ll post cleanly on nearly all of them.
Do I need Photoshop to make a GIF?
No. For a straightforward photo-to-GIF conversion, a browser tool is faster and enough. Photoshop is worth it only if you need frame-by-frame text overlays or precise per-frame editing.
Converting photos to GIF is one of the fastest ways to turn a handful of stills into something people actually stop and watch, no video editing skills required. Open the Image to GIF converter, drop in your photos, and you’ll have a finished, private GIF in under a minute.